Call Us: (312)241-1982

Sierra Chart | Rithmic Live Account Setup
Download and Installation Instructions:
Step 1 – Download Sierra Chart
Step 2 – Create Your Sierra Chart Account
Step 3 – To setup your Rithmic demo platform. Follow the instructions below:
-
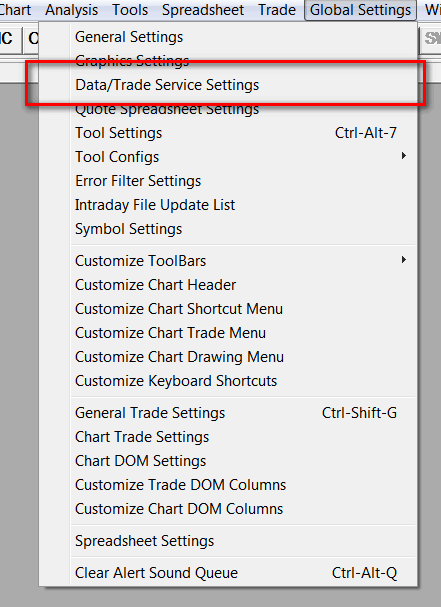
Go to Sierra Chart. Select Global Settings -> Data/Trade Service Settings on the menu.
-
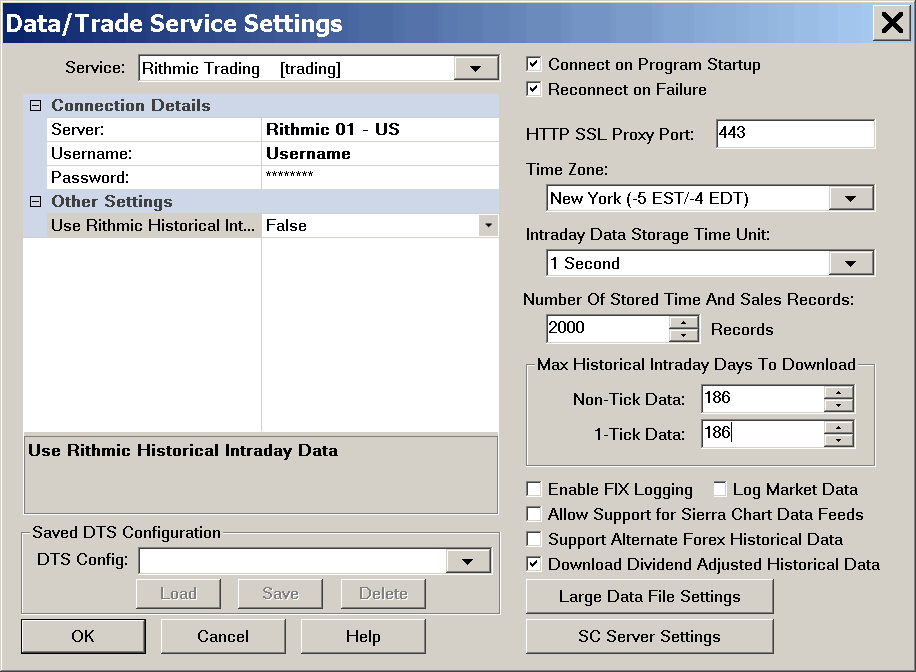
Click on the Service list box at the top of the window. Select the Rithmic Trading [trading] service name from the list. If you do not see that service in the list box, then please refer to help topic 52.
-
In the Server Box, you will need to select the server that your broker has specified for you to use. Normally this will be Rithmic 01 – US. If you are unsure what to select, then select Rithmic 01- US.
-
In the Username box, enter your Rithmic Trading account username provided in your email. This is case sensitive! Make certain you enter it exactly as provided by your broker.
-
In the Password box, enter your Rithmic Trading account password provided in your email. This is case sensitive! Make certain you enter it exactly as provided by your broker.
-
Set the Maximum Number of Historical Intraday Days to Download to what you require. Generally this should be set to 180.
-
Enable the Connect On Program Startup and the Reconnect on failure options.
-
All data is time stamped to UTC (GMT) time. In the Time Zone list box, select the appropriate time zone to display all times in. For complete information, refer to the Time Zone Setting documentation page.
-
Set the Intraday Data Storage Time Unit to what you require. If you are using Tick, Volume, Range, Reversal, or Renko charts, then make this 1 Second or less.
-
Press OK to close the Data/Trade Service Settings window.
-
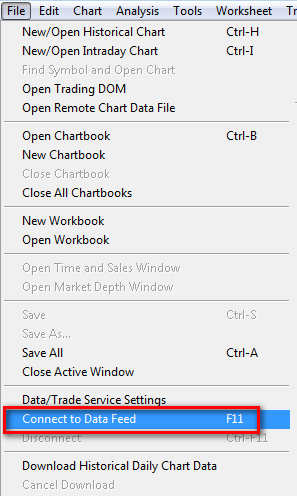
To connect to the data and trading servers, select File -> Connect to Data Feed on the menu.
-
If the Message Log window opens and displays messages indicating there was an error connecting to Rithmic, then select File -> Disconnect to prevent further connection attempts. Next, carefully review the setup steps above again. Try connecting to the data and trading servers again by selecting File -> Connect to Data Feed on the menu. If there still is an error connecting, then please review help topic 1.5.
-
Common connection error messages and descriptions. These will be displayed in the Message Log window.
- OS Error : There can be many reasons for this error. Only Rithmic Support can assist with it. Basically it indicates some kind of problem that the Rithmic software has when initializing itself which relates to the computer operating system. Please understand that the connection to Rithmic uses what is known as an API component. IT is not a direct connection which Sierra Chart uses for most other supported Data and Trading services. Try disabling any firewall software you may be running in your computer. The Windows firewall generally is not a problem and does not need to be disabled.
- Login Failed/Permission Denied : This usually means either your Username and Password that you have specified in Global Settings -> Data/Trade Service Settings are incorrect, or the demo account that you have is not allowed to connect from your system. If your demo account is restricted from your system, ask your broker to remove any restriction.
-
To open a Historical Chart, an Intraday Chart or a Trading DOM, select File -> Find Symbol on the menu. Locate the symbol in the lists and press the appropriate button. If you do not see the symbol that you need to use listed, please contact Sierra Chart support so that we can add it for you. However, if the symbol you need is not listed, then you can look up the symbol in the Rithmic R|Trader software. Once you have the symbol, manually type it into the Selected Symbol box on the Find Symbol window. The general format is: [symbol]–[exchange].
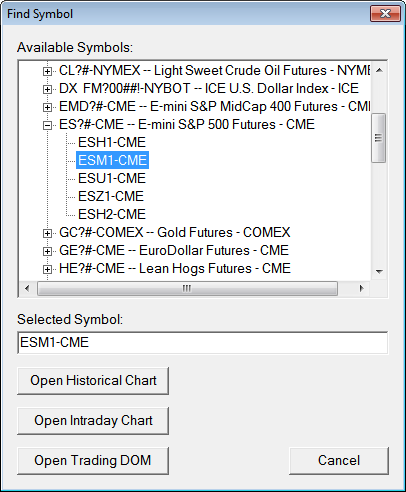
If you do not see any symbols listed in the Find Symbol window, then select Global Setting >> Symbols Settings >> Update From Server. Wait for the symbol list to update and then press OK.
-
Continue with step number 3 on the Getting Started documentation page.